


Hardware components | ||||||
_copy_P5AWOdT4dX.png?auto=compress%2Cformat&w=48&h=48&fit=fill&bg=ffffff) |
| × | 1 | |||
 |
| × | 1 | |||
 |
| × | 1 | |||
 |
| × | 1 | |||
.png?auto=compress%2Cformat&w=48&h=48&fit=fill&bg=ffffff) |
| × | 1 | |||
Software apps and online services | ||||||
 |
| |||||
| ||||||
Forgive me @Walabot team for my long delay for documentation, guilty!!......:(
Now I am trying to pickup and recover my memory and update documentation as much as possible.
This project is creating an intelligent switch connecting people's sleep to the switchers/power button of any type of intelligence devices, by Walabot heart rate tracking API.
Background stories:
1. Today I use app to play bedtime stories for my baby. But you never know when she really fall into sleep so that I could switch the app off, to save energy and avoid wake her up. The current solution is constantly checking her by eye but this is laboring and sometimes she is not really fall into deep sleep.
2. I believe I am not the only one and it has been so many times I watching TV or listening music to sleep and wasted electricity bill, or reading in the warm bed in the night until I feel so sleepy to switch off the light.
The problems raised in above stories could be solved by one simple solution by monitor people's sleep by Walabot heart rate monitoring API and link it to the switchers of App, light or whatsoever intelligence devices.
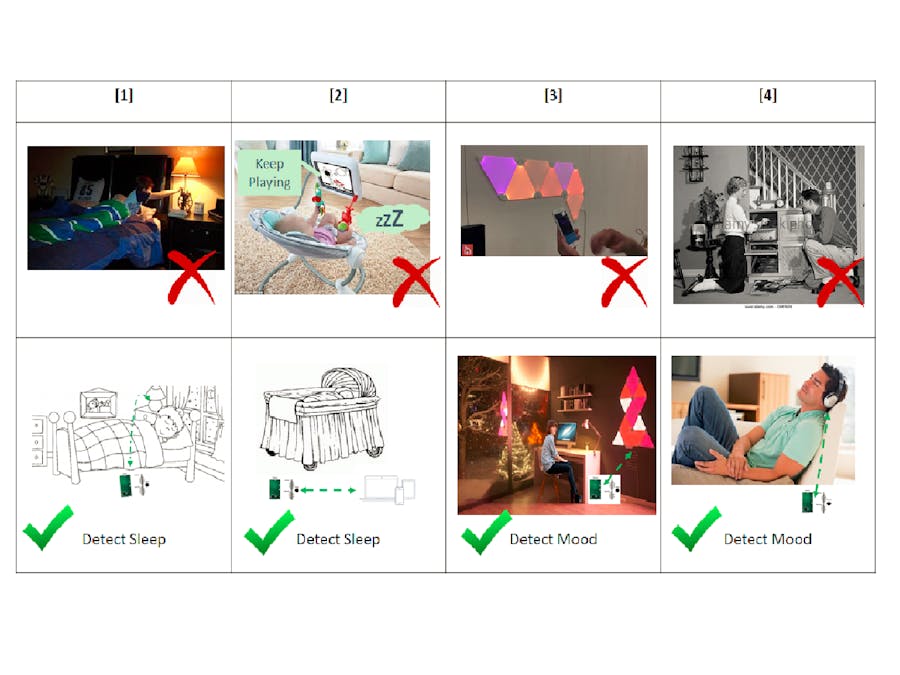
The first stage of this project would be focused on realize above mentioned functions, mainly connecting sleeping to bed light [1] and story app [2]. The switching condition could be either fixed set threshold of heart rate or personalized through machine learning. The monitor (Walabot) could be mount simply below beds/cots to ensure stable signal. In the future later stage possibilities could include but not limited to 1) link peoples mood (detected by machine learning heart rate variation) to light [3] and 2) intelligent DJ or even live auto composer [4].
It will offer not only the lazy people like myself a lazier life but the world an environmental efficient solution.
This project merged following existing projects:
"Punk Those Trick-or-Treaters with a 3D Radar Booby Trap" at https://makezine.com/projects/punk-those-trick-or-treaters-with-a-3d-radar-booby-trap/
"RASPBERRY PI HOME AUTOMATION - CONTROL LIGHTS, COMPUTERS, CCTV AND MORE!" at http://www.instructables.com/id/Raspberry-Pi-Home-Automation-Control-lights-comput/
Step 1: Do basic Pi setup.Starting with a fresh new Raspberry Pi 3, do all your basic Pi setup:
- connect to our Raspberry Pi via SSH (PuTTY)
- Install the Raspbian operating system, using NOOBs, following the directions at https://www.raspberrypi.org/learning/software-guide/quickstart/
- Update all packages to current by running the commands:
sudo apt-get updateand thensudo apt-get upgrade
Step 2: Do basic Walabot steup.
- Install the Walabot SDK and the WalabotAPI Python library using pip.
- Run
HelloWalabot.py.
- Check details at: https://github.com/Walabot-Projects/Walabot-HelloWalabot
Step 3: Configure the Pi to work with Walabot.
- As described in Walabot’s
PeopleCountercode example at https://github.com/Walabot-Projects/Walabot-PeopleCounter), simply add the following two lines to the end of your /boot/config.txt file:safe_mode_gpio=4max_usb_current=1Then reboot the Pi so the new settings can take effect.
Step 4: Connect the Walabot to the Pi.
- Connect them through an ordinary powered USB hub. The Pi doesn’t provide sufficient power on its own USB ports to run the Walabot, so you’ll get cryptic error messages and crashes if you try to plug the Walabot into the Pi directly.
Step 5: Download the Walabot software to your Pi.
- Open a terminal window by PuTTY.
- Download the Walabot SDK for Raspberry Pi from http://walabot.com/getting-started, then install the downloaded .deb file:
dpkg -i walabotSDK_RasbPi.deb
- Download the Python libraries:
python -m pip install "/usr/share/walabot/python/WalabotAPI-1.0.33.zip"
Step 6: Wiring Up the Lamp, Relay Connectors and Raspberry Pi
- Follow the wiring up procedures given in Step 4 of http://www.instructables.com/id/Raspberry-Pi-Home-Automation-Control-lights-comput/
Note for test and safety, it is STRONGLY recommended to use LED instead of Lamp and use battery instead of Power Socket.
Step 7: download code and play around
- Sleep_Switch_v1.0.4.py available at https://gist.github.com/lxasqjc/c9d3b476aa3f2cbfd6355cbf6326b72c
Full assembled photo:
Preliminary result video:
Again appreciate the support of Walabot team for offering free hardware!


Comments